Early Television
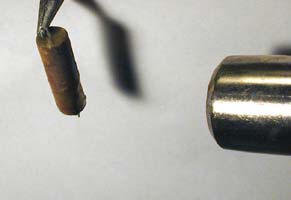
Rebuilding Paper CapacitorsThis is my procedure for rebuilding paper capacitors: 1. Remove the old capacitor from the circuit. I usually do 3 or 4 at a time, using alligator clip jumper cables to mark the two ends. I make a sketch to note which capacitor goes where, and which end is the ground end (though modern capacitors don't have a ground end, the sketch allows the rebuilt capacitor to be re-installed in the exact same way as the original). 2. Heat the capacitor with a heat gun. By heating the sides of the old capacitor, the wax will melt and drip off. This will remove the years of accumulated dirt. The wax holding the guts in will melt, allowing the leads to be pulled out from each end. The remaining material inside can be scraped out. Use the low heat on the gun, and be careful not to burn the cardboard.
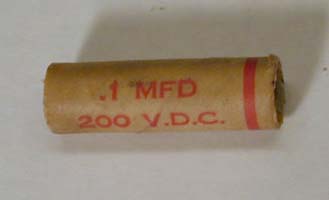
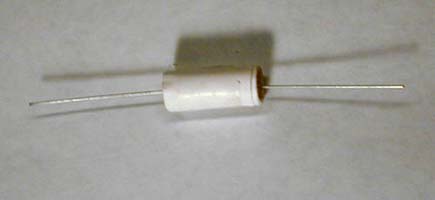
3. Wrap a new capacitor with paper to make the total diameter of the capacitor and paper slightly smaller than the inside of the old housing. Insert the new capacitor in the housing. If the fit is not snug, the hot wax will drip through. Note: new capacitors are much smaller than the original ones. In some cases two capacitors can be put in series or parallel to get odd values or higher voltages. Both will usually fit in the old shell. 4. Using the heat gun, melt candle wax of the same color as the old housing. A tin can with a small spout made with pliers works great to hold the wax. Support the capacitor with one end up, then pour the wax in the end and allow it to dry. Turn the capacitor over and pour wax in the other end. Another approach is to use a hot glue gun. Colored glue sticks are available from glu-stix. 5. Re-install the capacitor in the circuit. 6. Often capacitors have been replaced with modern (postwar) ones. In order to make the chassis look as authentic as possible, I remove the modern capacitors. I also remove the paper label from one of the prewar capacitors in the set and scan it into my computer. I then use Photoshop to create new labels for the capacitors which had been replaced with modern ones. Using Photoshop, I change the capacity and voltage on the label to match the values I need. Old capacitor shells salvaged from immediate postwar sets are then rebuilt as described above. The labels are then glued to these capacitors. 7. Not all capacitors can be rebuilt in this way. Some, like the ones in the HMV sets, have the ends of the cardboard crimped around so that it is impossible to open them without destroying the shell. In this case I use a razor knife to make a cut from one end to the other. Then, I remove the old capacitor, insert a new one, and glue the shell back together. When it is replaced in the set I orient the cut side down so it won't be visible. Others, like those in the RCA sets, have the ends crimped around, but they can be opened up without damage. I open one end, remove the old capacitor, install a new one, and then recrimp the end. I use superglue to reseal the end. Here is a chassis undergoing capacitor rebuilding. The clip leads mark where capacitors have been removed. I write down the value of the capacitor, together with the color of the clip lead. At the top you can see the 5 capacitors hanging from the edge of the chassis, waiting for the superglue we used to seal the ends to dry. |