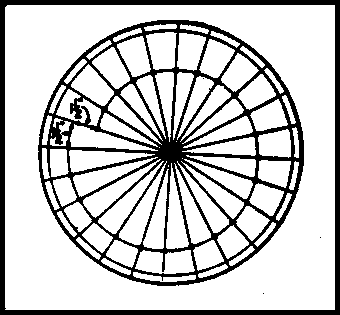
This method of making
your own scanning disk
was first described in 1928 |
|
Although patented in 1884, it wasn't until some 40 to 50 years later that it finally came into significant use. By then it had developed into lens and mirror types, multiple spirals and some even with color filters over the holes. Other users bent the edge of the movies, all of the scanning holes were located on the same radius. The point being that the Nipkow disk was produced in many varieties, but by far, the original design was the most common. And for the experimenter, it was and still
is the most popular.
However, keep in mind that the scanning disks are an important part of the optical systems that will be dissecting or reconstituting the image in your camera and receiver. The quality of your scanning disks has a
strong bearing on the final appearance of the image you actually achieve. Building your own disks is acceptable if you are willing to "just get by". But if you want to see images on your system of the same quality as those experimenters that used Jenkins or Sanabria parts, you need to use precision made parts. I have these parts available for you at prices that are actually lower than their cost in the depression years, considering inflation since those times. Check them out. |
For your first attempt at making your own Nipkow disk, you might consider using cardboard about .032 thick, enerally obtainable from artist supply shops. A twelve inch diameter disk is a good size to begin with and by scanning holes this disk will have. For now let's say that this disk will have 24 holes. The holes will need to be equally spaced in angle around the disk.
A circle is usually divided into 360 parts or degrees. By dividing 360 by the number of holes, you will know that the angle between holes in this case is 15 degrees. If you have limited tools, the easiest way to locate and mark the angular location of each hole is to use a straight edge and pencil. Divide the circle into two equal parts. Next, divide and mark each of the two halves into two equal quarters and then into eighths. Finally, divide each eighth into three parts. You now have the circle divided into 24 equal segments and the line between each segment is the angular location of each scanning hole.
This 12 inch disk will provide an image that is approximately 1.5 inches square, horizontally scanned when viewed at the 12 o'clock position on the disk. When viewed at the 3 o'clock position the image appears vertically scanned. The scanning holes will be .063 inches in diameter and if you are using cardboard, a drill bit, large needle or even a nail will do. With other materials, a 1/16" drill bit should be used. No matter what material, a light center punch mark is advised at each hole location, prior to drilling.
The first hole of the 24 holes in the spiral will be located on any one of the lines and .25 inches in from the outer edge of the disk. The second hole is located on the next line, 1/16 inch nearer the center of the disk. Each hole, as you move around the disk, is 1/16 inch nearer the center, in respect to the previous hole.The final step is to drill the center hole for the motor shaft and hub. It is important that it be in the exact center, so careful drilling is in order.
Another method for locating the holes, once the disk is divided into equal segments, is to place a non-rotating peg of a certain diameter in the center of the disk (in this case, just under .5 inches in diameter), and tie a marker or stylus with a short length of piano wire or cord to the center peg. As you move the marker around the disk, the cord wraps onto the peg, pulling the marker inward the proper amount as it goes. As the marker crosses each line, you can mark the spot for the hole. Finally, for appearance sake, a light coating of a flat black spray paint will give your work a more professional look.
Except for mounting, your disk is ready. Good Luck.
Congratulations!
|